At work, we use SSH to connect to our infrastructure using PIV and a Yubikey to comply with the PCI DSS standard. I’ve seen a post from Christian Stankowic (aka “stdevel”) on Mastodon showing a Yubikey for personal use, so I decided to give it a try. This blog post is the result of how I use a Yubikey outside of work.
Parts:
I’m not paid to promote these products.
Disclaimer
Modifying security keys may be dangerous. I cannot be responsible of any data loss that may have been caused. Use the commands with caution.
Requirements
I’m running on Ubuntu 24.04 (Noble Numbat) at the time of writing. The easiest way to install Yubikey Manager to set up the Yubikey is to use the PPA.
sudo add-apt-repository ppa:yubico/stable
sudo apt-get update
sudo apt-get install yubikey-manager
ykman --version
If you have another system, please follow the official documentation.
SSH with FIDO2
At home, I self-host multiple services from a distributed file storage, finances to my home lab. They run on various hosts accessible via SSH. But instead of relying on PIV, like at work, I wanted to try something more secure and supposed to be easy to use: FIDO2.
The components:
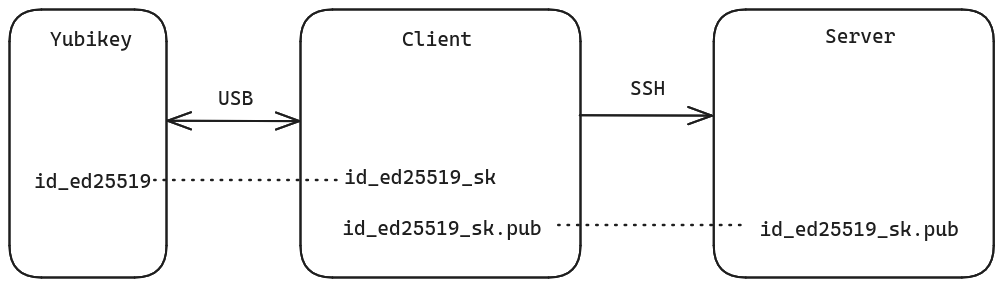
In short, it’s a regular public and private key system, using eliptic-curve cryptography (“ECC”), but instead of storing the private key on on your client, an access key (with “sk” suffix for “Security Key”) is used to access the private key on the Yubikey.
Like regular SSH keys, a password can protect the private key itself.
With FIDO2 on the Yubikey, there are two more security mechanisms to be aware of:
- PIN: alphanumeric password, special chars allowed, that must be at least 4 chars long
- Touch: security that requires you to touch the “Y” area of the Yubikey with your finger to validate your physical presence
Note that the minimum version of OpenSSH with FIDO2 support is 8.2, which means at least Debian 11. If you have older versions around, it’s time to upgrade!
PIN
By default, the FIDO PIN is not defined. You should generate a strong PIN from a password manager like KeepPassXC.
read -s PIN
echo -ne $PIN | wc -c
ykman fido access change-pin --new-pin "${PIN}"
SSH keys
The next step is to create a pair of SSH keys. This operation has to be
repeated for each client. The Yubikey is able to store multiple private keys.
One private key should not be re-used by multiple clients because that would
mean the access key, which must stay private, on the client
(~/.ssh/id_ed25519_sk) used to unlock the private key on the Yubikey, has to
be moved around, which is a bad practice.
I’ve chosen the Ed25519 algorithm instead of ECSDA because interoperability is not an issue for me, all my systems are up-to-date and compatible. Both are strong options. Both are not RSA.
ssh-keygen -t ed25519-sk -O resident -O verify-required \
    -O "application=ssh:$(hostname -f)" \
    -C "$(hostname -f)"
Enter the PIN, touch the Yubikey then set a password to protect the SSH key.
Finally copy the public key to the remote hosts (file
~/.ssh/id_ed25519_sk.pub).
SSH agent
The main problem is that we need to pass 3 security tests for every single SSH connection:
- Enter the password of the SSH key
- Enter the FIDO2 PIN of the Yubikey
- Touch the Yubikey
I know this is security but it’s not very user-friendly. So I’ve tried to use an SSH agent to “cache” the private key for a limited amount of time, like I do for regular keys and even with PIV.
Let’s try to add the identities to the agent:
$ ssh-add -K
Enter PIN for authenticator:
Resident identity added: ED25519-SK SHA256:***
$ ssh-add -l
256 SHA256:***  (ED25519-SK)
Then connect:
$ pilote
sign_and_send_pubkey: signing failed for ED25519-SK "/home/jriou/.ssh/id_ed25519_sk" from agent: agent refused operation
Unfortunately, the SSH agent doesn’t seem to load the FIDO keys properly. To
fix this issue, you can disable the agent in file ~/.ssh/config:
Host *
    IdentityAgent none
You still need to pass the 3 security checks but, at least, you can connect.
I use Ansible to manage most of my personal infrastructure. With FIDO2, you can multiply the number of security checks by the number of managed host. This is a nightmare. Unfortunately, I’ve chosen to create a regular ed25519 key pair and use it only for Ansible from one host that will never leave my secure house.
FIDO U2F to replace OTPs
This open authentication standard enables you add an additional security check based on a hardware key, to log on a website for example. Traditionally, you have to enter your user name and your password. You can add two-factor authentication with an application generating one-time passwords (“OTP”). They are generated for a limited amount of time. I have way too many OTPs registered in my FreeOTP application. FIDO U2F is a way to replace your OTP by touching your Yubikey. As simple as that.
It’s supported by plenty of platforms including (but not limited) Mastodon, Github and Linkedin. The workflow to setup a hardware key goes often like this:
- Go to Settings / Security or Account
- Look for 2FA or MFA
- Setup OTP (even if you won’t use it)
- Search for hardware key
- Enter the FIDO PIN
- Touch the Yubikey
The interface will be different for each platform but the workflow should be the same.
PGP
Nowadays, communication systems provide transparent end-to-end encryption. But it’s not always enabled by default (I see you Telegram). Do you trust those providers claiming they are not able to decrypt your messages? Where are my keys? Can I bring my own? It’s encrypted, trust me bro.
Technically, Pretty Good Privacy (“PGP”) solves this issue. I can generate my own set of keys to encrypt or authenticate data using public key cryptography. ECC is supported. The private key can be protected by the Yubikey.
The only problem is to find people like me, believing in privacy, able to use PGP to encrypt communications. In our daily lives, we talk mostly to non-technical people that don’t know a word about how cryptography works or even how computers work. E-mails are less and less used. Which means I don’t use PGP to encrypt my messages very often, except at work.
Another usage of PGP is to encrypt sensible files. In that case, storing the private key on a Yubikey is a good way to make it more secure. But at the same time, if you loose the key, you will never be able to decrypt the original files. You can still export the private key and store it somewhere secure. But how secure is it? Here it comes the endless loop of paranoia to encrypt the key of the key of the key of the… You get it. I’ve chosen to protect the exported private key by a password stored on my password manager which has its own password that I know in my head. The security stops if I forget the password manager’s password, and it’s ok.
I also use PGP to sign my git commits.
Access
There are two differents PINs for the PGP application on the Yubikey:
- Admin PIN: to unlock PGP administration commands
- PIN: to unlock the PGP private key
The PIN is specific to the PGP application. If you have already set up a FIDO PIN, please chose a different one for PGP.
Unlike FIDO, default PINs are set from factory. Run the “reset” operation only if you don’t know the current PIN. Be careful, this is a destructive operation. Any existing PGP key will be removed.
ykman openpgp reset
Change the Admin PIN:
ykman openpgp access change-admin-pin --admin-pin 12345678
Change the PIN:
ykman openpgp access change-pin --pin 123456
Generate key
Let’s generate the key pair locally, then move the private key to the Yubikey afterwards.
gpg --expert --full-gen-key
Please select what kind of key you want:
   (9) ECC (sign and encrypt) *default*
Your selection? 9
Please select which elliptic curve you want:
   (1) Curve 25519 *default*
Your selection? 1
Please specify how long the key should be valid.
Key is valid for? (0) 1y
Is this correct? (y/N) y
Enter real name, e-mail address and eventually a comment.
Validate:
Change (N)ame, (C)omment, (E)mail or (O)kay/(Q)uit? O
Then move key to the Yubikey:
gpg --edit-key 0x1234
gpg> keytocard
Enter the PGP password, the one to protect the private key itself, then the Admin PIN to store it on the Yubikey.
Publish to keyserver
How to discover public keys from other people?
- Participate to a key signing party (at FOSDEM for example)
- Use a keyserver, because we cannot meet everybody in person
The keys.openpgp.org server seems to be a popular option to publish your public key. It verifies your identity by sending an e-mail to every PGP identity (= e-mail) included in the published key.
gpg --export 0x1234 | curl -T - https://keys.openpgp.org
Info on the card
The gpg binary enables you to store more information like your full name and the URL of your public key, directly on the Yubikey. Feel free to set them up or not. Anyone grabbing your Yubikey will be able to retreive such information.
gpg --card-edit
gpg/card> admin
gpg/card> name
Enter your last name, first name, then the Admin PIN to save the modification.
For the URL:
gpg/card> url
Enter the public key URL (ex:
https://keys.openpgp.org/vks/v1/by-fingerprint/1234), then the Admin PIN to
save the modification.
Verify:
gpg --card-status
This commands tells you if your Yubikey has been detected by the gpg application by showing the card details. Sometimes, you could have the following error:
gpg: OpenPGP card not available: General error
In that case, you should unplug then plug your Yubikey.

Renew an expired key
It’s important to set an expiration duration because if you lose control over your key, it will expire automatically. I’ve performed this operation a couple of times over the years.
Edit the main key:
gpg --edit-key 0x1234
gpg> expire
Key is valid for? (0) 1y
Is this correct? (y/N) y
Enter the PIN to unlock the Yubikey.
Then edit the sub key:
gpg> key 1
gpg> expire
Key is valid for? (0) 1y
Is this correct? (y/N) y
Enter the PIN to unlock the Yubikey.
Save and publish:
gpg> save
gpg --keyserver keys.openpgp.org --send-keys 0x1234
This doesn’t prevent from compromision. In that case, you should revoke the key.
Sign git commits
Git is a very popular version control software used by open-source projects to distribute code and accept contributions. Show the world that you own your git commits! With PGP, you can sign your commits so everybody can verify that you are effectively the one and true author of the commit, or your private key has been compromised but that’s another topic.
File ~/.gitconfig:
[user]
	email = first@name.email
	name = First Name
	signingkey = 0x1234
Every time you will try to commit a change using git, you will have to unlock your PGP private key on the Yubikey by entering the PIN.
Finally, add your public key to your Github account so everyone will see the check mark on your commits.

Sudo
The Yubikey can be used to secure sudo, the software used to execute commands with root privileges. You can decide to replace your password by a touch on the Yubikey (“passwordless”), or add a touch on the Yubikey after the password (“2FA”). This blog post describes the procedure to do both.
I’ve tried to setup a passwordless authentication for sudo but I’m still asked for my password from time to time. And when the Yubikey requires to be touched, sudo doesn’t print any instruction on the terminal, the Yubikey starts to blink. The sudo command is not stuck, you just have to touch the Yubikey.
Conclusion
Is my digital life more secure now? Yes, probably. But security comes at a cost. The cost of entering two passwords and touch the Yubikey for every single SSH connection (maybe using SSH with PIV is easier after all). The cost of encrypting messages with PGP to non tech-savvy people. The cost of monitoring the expiration date of your PGP keys. The cost of the Yubikey itself. On the bright side, replacing vicious OTPs that regenerate too quickly by a simple touch is very nice! Same for sudo. In the end, it was a fun project and that’s what matters.